Microsoft reiterated that Windows 8 has been built upon the solid
foundations of its predecessor. Well, there is no denying this fact,
because apart from looking stunning, Windows 8 includes several robust
features under the hood that make it fast, stable and snappy, just like
the previous version. One of the refreshing additions to this
feature-set is automatic system maintenance (also called Regular
Maintenance), which checks for software updates, system diagnostics and
security scanning tasks, on regular basis. This option ensures that
maintenance tasks are performed at a specified time, provided you’re not
around and the system is idle. In what follows, we will guide you
through the process of changing time settings to run the daily
maintenance task, whether to allow the schedule maintenance to wake your
machine, as well as disable this feature if you don’t need it.
Change Scheduled Maintenance Time
To change time settings for automatic system maintenance, click the
Action Center icon in the System Tray followed by ‘Open Action Center’.
Alternatively, you can access the Action Center from the Control Panel.

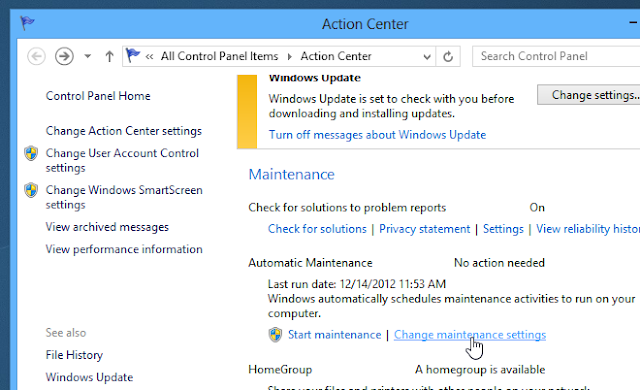
In the Action Center window, click the arrow beside Maintenance to
expand its settings, and then click ‘Change maintenance settings’ under
the Automatic Maintenance section, as demonstrated in the screenshot
below.

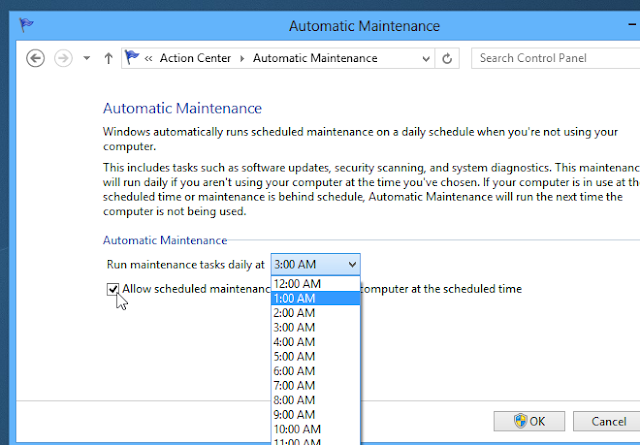
Here, you can choose the maintenance time according to your liking.
Windows 8 sets this time to 3:00 AM by default, but you can change it
to any other time. Furthermore, you can enable/disable the optional
‘Allow scheduled maintenance to wake up my computer at the scheduled
time’. When done, click OK to apply the changes. If prompted by the UAC,
simply click the Yes button.

Disable Automatic Maintenance
Apart from changing time parameters, you can also disable the
Automatic Maintenance option altogether. This can done from within the
Windows Task Scheduler utility. To do so, press Win+W to call the Search
Charm and type “task scheduler” or “schedule tasks”. Selecting Schedule
tasks from the left will launch the Task Scheduler window.
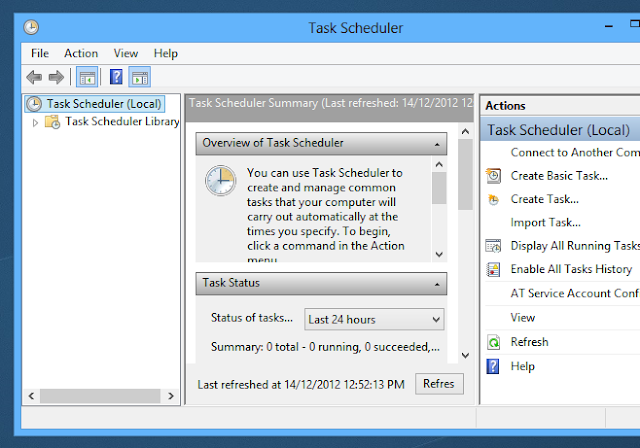
Task Scheduler is Window’s native utility that allows various
system or user applications to be launched or triggered automatically at
a user defined time. It houses three navigation panes. The left pane
lets you select the task, the center pane contains information regarding
the selected task, while the right pane contains further pertaining
actions.

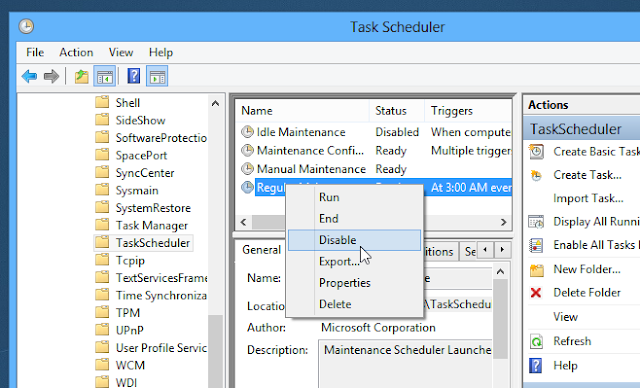
From the left pane, navigate to:
Task Scheduler Library > Microsoft > Windows > TaskScheduler
Right click ‘Regular Maintenance’ from the center pane and select Disable from its context menu.

That’s it! You have successfully disabled Regular Maintenance.


0 comments:
Post a Comment